4

現在、Xcode6.4 SwiftでStoryboardを使用せずにコードだけでアプリを作っています。
が、あるページでTableViewのカスタムセルを使うことになりコードだけで書くのは困難なためそのページだけStoryboardを使用したいと思っています。
StoryboardとXibは最初に削除しており、その後新たに追加しました。
info.plistのMain storyboard file base nameには追加したStoryboard名を追加しましたが、Storyboardで作ったTableViewがエミュレータで表示されません。

何か処理が足りないのでしょうか。
コードは以下のようになっています。

// AppDelegate

import UIKit

@UIApplicationMain

class AppDelegate: UIResponder, UIApplicationDelegate {

var window: UIWindow?

func application(application: UIApplication, didFinishLaunchingWithOptions launchOptions: [NSObject: AnyObject]?) -> Bool {

    self.window = UIWindow(frame: UIScreen.mainScreen().bounds)
    self.window?.backgroundColor = btWhite

    self.window?.rootViewController = UINavigationController(rootViewController: AreaSelectViewController())


    // ステータスバー文字色
    UIApplication.sharedApplication().setStatusBarStyle(UIStatusBarStyle.LightContent, animated: true)
    // ナビゲーションバーの色
    UINavigationBar.appearance().barTintColor = btGreen
    // ナビゲーションバーボタンのベースの色(設定アイコンの色など)
    UINavigationBar.appearance().tintColor = btWhite
    // ナビゲーションバーのタイトル色フォント
    if displayWidth == 414{
        UINavigationBar.appearance().titleTextAttributes = [NSForegroundColorAttributeName: btWhite, NSFontAttributeName:btFont22B!]
    }
    else if displayWidth == 375{
        UINavigationBar.appearance().titleTextAttributes = [NSForegroundColorAttributeName: btWhite, NSFontAttributeName:btFont20B!]
    }
    else{
        UINavigationBar.appearance().titleTextAttributes = [NSForegroundColorAttributeName: btWhite, NSFontAttributeName:btFont18B!]
    }
    // ナビゲーションバーアイテムの色フォント
    UIBarButtonItem.appearance().setTitleTextAttributes([NSForegroundColorAttributeName: btWhite, NSFontAttributeName: btFont14B!], forState: UIControlState.Normal)

    self.window?.makeKeyAndVisible()

    return true
}

func applicationWillResignActive(application: UIApplication) {}
func applicationDidEnterBackground(application: UIApplication) {}
func applicationWillEnterForeground(application: UIApplication) {}
func applicationDidBecomeActive(application: UIApplication) {}
func applicationWillTerminate(application: UIApplication) {}

}

//遷移先のView(Storyboardで作ったもの)ここがナビゲーションバーのみ表示され、Tableが表示されない

import UIKit

class ViewController: UIViewController, UITableViewDelegate, UITableViewDataSource {


@IBOutlet weak var tableView: UITableView!

override func viewDidLoad() {
    super.viewDidLoad()
    // Do any additional setup after loading the view, typically from a nib.

    // tableViewの紐付け
    tableView.delegate = self
    tableView.dataSource = self
}

override func didReceiveMemoryWarning() {
    super.didReceiveMemoryWarning()
    // Dispose of any resources that can be recreated.
}

// セルに表示するテキスト
let texts = ["hello", "swift", "world"]

// セルの行数を取得するメソッド(tableViewの実装に必須)
func tableView(tableView: UITableView, numberOfRowsInSection section: Int) -> Int {
    return texts.count
}

// セルの内容を変更するメソッド(tableViewの実装に必須)
func tableView(tableView: UITableView, cellForRowAtIndexPath indexPath: NSIndexPath) -> UITableViewCell {
    let cell: UITableViewCell = UITableViewCell(style: UITableViewCellStyle.Subtitle, reuseIdentifier: "Cell")

    cell.textLabel?.text = texts[indexPath.row]
    return cell
}

}

遷移先のViewへは、遷移元から
self.navigationController?.pushViewController(ViewController(), animated: true)
で遷移させています。

また、ViewControllerの
tableView.delegate = self
tableView.dataSource = self
で、
Thread 1:EXC_BAD_INSTRUCTION(code=EXC_l386_INVOP,subcode=0×0
のエラーが画面遷移時に出ます。
2 件の回答 2

2

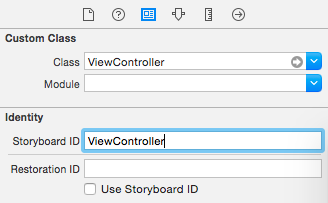
まず、Storyboard上で遷移先のViewControllerにStoryboard IDを設定します。好きな名前でかまいません。
Storyboard ID

そして、下記のようにしてViewControllerを生成/遷移します。instantiateViewControllerWithIdentifierの引数にはStoryboard IDに設定した文字列を使います。(今回、クラス名と同じにしてしまったのでちょっと紛らわしいですが)

let vc = self.storyboard?.instantiateViewControllerWithIdentifier("ViewController") as! ViewController
self.navigationController?.pushViewController(vc, animated: true)

追記です。
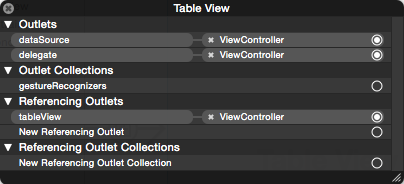
コード中心で作成されているようなので蛇足になるかも知れませんが、delegatedataSourceの設定をStoryboard上で行えばコードを書く必要がなくなります。
delegateとdataSourceの紐付け
こうすれば、

tableView.delegate = self
tableView.dataSource = self

これを書かなくてよくなります。

1
  • 上記の方法で解決することができました! ご丁寧にありがとうございました!
    – ariyu
    Commented 2015年8月31日 1:05
1

StoryboardとXibは最初に削除しており、その後新たに追加しました。 info.plistのMain storyboard file
base nameには追加したStoryboard名を追加しましたが、

これは不要。というかしないほうがいい。

UIViewController(のサブクラス)を、Storyboardこみで呼び出すには、UIStoryboardクラスを使います。UIStoryboardのインスタンスを生成するという形で、Storyboardファイルをロードします。

init(name name: String, bundle storyboardBundleOrNil: NSBundle?)

以下、アプリ起動時に表示するViewのViewControllerを、ViewController、ナビゲーションで、PushするViewControllerをNextViewControllerとして、サンプルコードを作ってみました。

AppDelegate.swift

import UIKit

@UIApplicationMain
class AppDelegate: UIResponder, UIApplicationDelegate {

    var window: UIWindow?


    func application(application: UIApplication, didFinishLaunchingWithOptions launchOptions: [NSObject: AnyObject]?) -> Bool {
        let viewController = ViewController()
        let navigationController = UINavigationController(rootViewController: viewController)
        self.window = UIWindow(frame: UIScreen.mainScreen().bounds)
        self.window?.backgroundColor = UIColor.whiteColor()
        self.window?.rootViewController = navigationController
        self.window?.makeKeyAndVisible()
        return true
    }

// 後略

ViewController.swift

import UIKit

class ViewController: UIViewController {

    override func viewDidLoad() {
        super.viewDidLoad()
        // 画面遷移するボタンを生成
        let button = UIButton.buttonWithType(UIButtonType.System) as! UIButton
        button.frame = CGRect(x: 20.0, y: 100.0, width: 80.0, height: 24.0)
        button.setTitle("Go Next", forState: UIControlState.Normal)
        button.addTarget(self, action: "goNext:", forControlEvents: UIControlEvents.TouchUpInside)
        self.view.addSubview(button)
    }

    override func didReceiveMemoryWarning() {
        super.didReceiveMemoryWarning()
        // Dispose of any resources that can be recreated.
    }

    // Button Selector
    func goNext(sender: AnyObject) {
        // NextViewController.storyboardファイルをロードする。
        let storyboard = UIStoryboard(name: "NextViewController", bundle: nil)
        // StoryboardからNextViewControllerのインスタンスを生成
        let viewController = storyboard.instantiateInitialViewController() as! NextViewController
        // NavigationControllerで画面遷移
        self.navigationController?.pushViewController(viewController, animated: true)
    }

}

これらのコード以外の作業として、まずNextViewControoler.storyboardというStoryboard書類を作成します。そしてNextViewController.swiftというファイルも作成します。
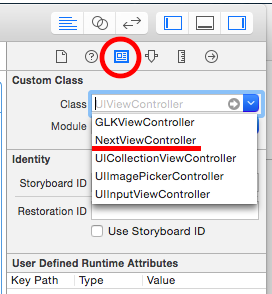
NextViewControoler.storyboardで、ViewControllerインスタンスをドロップして作成し、クラス名をNextViewControllerにします。(下図)

画像の説明をここに入力

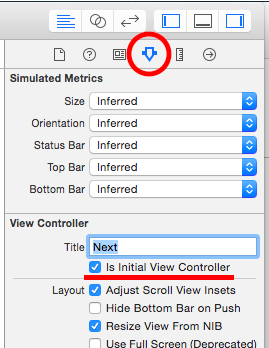
そして、ViewControllerインスタンスを、Initial View Controllerに指定します(Is Initial View Controllerにチェックを入れる。下図)。

画像の説明をここに入力

1
  • 上記の方法で解決することができました! ご丁寧にありがとうございました!
    – ariyu
    Commented 2015年8月31日 1:05

この質問に回答するには、ログインする必要があります。

求めていた回答ではありませんか? のタグが付いた他の質問を参照する。