本文に 2927 文字追加
ソース リンク
Hana
  • 17
  • 1
  • 8

↓変更後

import UIKit

class ViewController: UIViewController, UITableViewDataSource, TestDelegate {

@IBOutlet weak var testTableView: UITableView!


//表示データ
var dataList = ["","","","","","","",""]

//データを返すメソッド(スクロールなどでページを更新する必要が出るたびに呼び出される)
func tableView(_ tableView:UITableView, cellForRowAt indexPath:IndexPath) -> UITableViewCell {
    let cell = tableView.dequeueReusableCell(withIdentifier: "TestCell", for:indexPath) as UITableViewCell
    cell.textLabel?.text = dataList[indexPath.row]
    
    return cell
}

//データの個数を返すメソッド
func tableView(_ tableView:UITableView, numberOfRowsInSection section:Int) -> Int {
    return dataList.count
}


//削除ボタン
func tableView(_ tableView: UITableView, commit editingStyle: UITableViewCellEditingStyle, forRowAt indexPath: IndexPath) {
    if editingStyle == .delete {
    dataList.remove(at: indexPath.row)
    testTableView.deleteRows(at: [indexPath], with: .fade)
    }
}

    
func TableView(_ tableView: UITableView, cellForRowAt indexPath: IndexPath) -> UITableViewCell {
    let cell = tableView.dequeueReusableCell(withIdentifier: "Cell", for: indexPath)
    cell.textLabel?.text = "No. \(indexPath.row)"
    // 偶数行にDetailボタンを表示する。
    if indexPath.row & 0x01 == 1 {
        cell.accessoryType = .detailButton
    }
    
    return cell
}

// UITableViewDelegate
// アクセサリボタンをタップしたら……
func tableView(_ tableView: UITableView, accessoryButtonTappedForRowWith indexPath: IndexPath) {
    // セグエGoNextを実行する。
    performSegue(withIdentifier: "GoNext", sender: nil)
}


override func viewDidLoad() {
    super.viewDidLoad()
    // Do any additional setup after loading the view, typically from a nib.
  
   //自作セルをテーブルビューに登録する。
    let testXib = UINib(nibName:"TestTableViewCell", bundle:nil)
    testTableView.register(testXib, forCellReuseIdentifier:"TestCell")
}

//デリゲートメソッド
func textFieldDidEndEditing(cell: TestTableViewCell, value:String) {
    //変更されたセルのインデックスを取得する。
    let index = testTableView.indexPathForRow(at: cell.convert(cell.bounds.origin, to:testTableView))
    
    //データを変更する。
    dataList[index!.row] = value
    print(dataList)
}

override func didReceiveMemoryWarning() {
    super.didReceiveMemoryWarning()
    // Dispose of any resources that can be recreated.
}
    

}

@nagonsoftware さんの教えていただいた通りにやったつもりなのですが、iの丸を押しても画面遷移できません。
上に載せたコードは、ViewControllerのものです。
TableViewのCellはTextFieldをタップするだけで簡単に入力できる仕組みにしています。
この仕組みのコードを書いているから、画面遷移できないのかなと思い、色々コードを書く順番を並び替えたりしたのですが、ダメでした。。
何が原因で画面遷移ができないのか、さっぱりわかっていません。
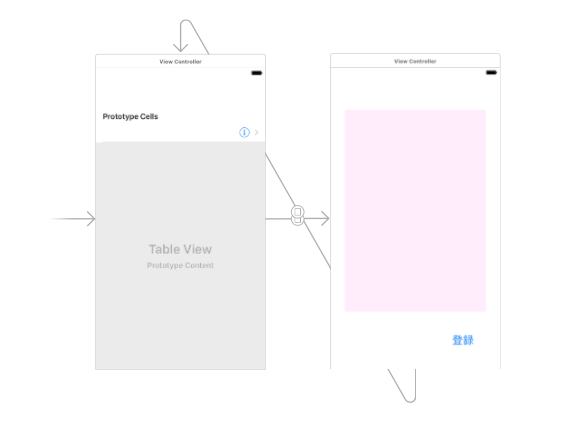

ソース リンク
Hana
  • 17
  • 1
  • 8

cellのaccessoryで付けることができるDetailを押して、画面遷移したい

cellのaccessoryで付けることができるDetail(iの丸マーク)を押すと、画面遷移できる仕組みにしたいのですが、どのように関連付けをしたり、コードを書けばいいのかわかりません。

画像の説明をここに入力

画像の説明をここに入力

関連付けはしてみたものの、マークを押しても全く動きません。